Do-it-yourself bird - a technique of making from improvised means (95 photos). Birds made of paper (55 crafts for children) Bulky birds made of paper
Few people know that April 1 is celebrated not only with April Fool's Day, but also with International Bird Day. But this holiday is well known to teachers of preschool and school institutions.
By the middle spring month, teachers and their pupils begin to make crafts related to birds. For example, as before the cold and hungry season, numerous bird feeders appear on the trees, in the spring the guys try to provide their feathered friends with housing.

Of course, wood crafts that need to be planed, sawed and used with a dangerous tool to create them are not suitable for all ages. Kids who go to kindergarten are unlikely to cope with such a job.

You can celebrate the wonderful holiday of Bird Day by creating a bird craft. Feathered figurines are made from a wide variety of raw materials, using felt, woolen threads, colored paper, plastic bottles, autumn leaves and others, for which there is enough imagination.

Sometimes parents are faced with the problem of how to make a bird from the materials at hand. Above, there was already information that there are practically no restrictions. The step-by-step instructions for novice craftsmen presented on the site will suggest new ideas for creativity.


Master class on how to make a bird for the little ones
Even the little guys of Nosadov's age can master a few ideas for original crafts.

You will need colored paper, sticky paper bookmarks, glue stick, scissors, toothpicks or thin sticks, and plasticine or clay.

Make circles from colored paper (according to the required number of birds). Circles can be of different diameters. Fold each circle in half. Glue the bookmark strips on the inside.

Glue a triangle on the other edge - this will be the bird's beak. From the outside, glue the wings all from the same bookmark paper. Attach a toothpick or stick inside and stick it into a piece of plasticine. You can draw the bird's eyes.

For the next craft, you need white or colored paper, scissors and pencils.

Circle the palm of your hand (yours or your child's) on the paper. Use scissors to cut the shape along the outline. The thumb is the head of the bird. The rest are tail and wings. Draw in the beak and eyes. You can paint the torso. The bird is ready!


Another option for a bird with your own hands from scrap materials. Prepare cotton pads, wooden kebab sticks, scissors, glue, ribbons for decoration, or pretty thread.

Glue two cotton pads on a wooden stick (the skewer should be inside). And just below, in the same way, glue two more. You will get a little snowman.

Cut one cotton pad into two equal parts. Glue them to the lower discs on the stick - these are the wings. Cut out the eyes and beak from colored paper. Stick to the top discs. For beauty, you can tie a beautiful ribbon around the bird's "neck".

Owl made of paper
You will need toilet paper rolls, cardboard or thick paper, colored paper, paints, scissors, and glue.

If there are no ready-made cylinders, glue them from scrap materials: paper or cardboard. Bend the top of the cylinder inward from one end and make sharp owl ears. The photo of the bird shows how to do this.


Cut out many circles with a diameter of up to 1 cm from colored paper.They should be the same size. Stick the circles on the cylinder.

Cut out the beak-triangle and stick to the appropriate place. Collect owl eyes from black and white circles and glue to the cylinder. The owl is ready!

Crafts of birds from threads
Let's talk about two ways to make a birdie out of threads with your own hands.

You will need yarn, cardboard, needles, scissors.

Make blanks from cardboard to create pompons: circles with a diameter of 5 and 2 cm, cut out circles with a diameter of 2 and 1 cm, respectively. Wrap the threads on the cardboard. The internal space must be completely filled.


Cut the threads along the edge, thread the thread, remove the pom-pom from the cardboard and tighten the thread. Straighten the threads to create a fluffy ball. Make a smaller pompom as described above.


Connect the two pom-poms. On the smaller one, which is the bird's head, sew on the beaded eyes and fabric beak.

For the second method, you need three colors of yarn, scissors, thin wire.

From one color of yarn, make a bundle of threads 13 cm long. From the other two bundles of 9 cm. Their thickness should be approximately the same.

Place one of the short ones in the middle of the longest skein. Fold over a long skein and tie at the base. Do the same with the short one. Place the third bundle under the knitted threads.

Roll a tight ball of cotton wool and place it under all the threads. Bring all the ends together so that the ball is inside. Tie up the yarn with thread. Use scissors to trim the ends of the bird's tail.


Sew on or glue on beaded eyes and a fabric beak like felt. Make bird paws out of thin wire and fasten them in the thread body.

Felt bird
Very cute crafts are made from fabric. Below is the procedure for creating a felt bird.
- Find it on the Internet or use the given bird pattern. Print and cut out your felt pattern.
- Sew on the wrong side, leaving a small hole.
- Stuff the figurine with cotton wool or printed material.
- Sew the hole carefully with a blind stitch.
- The eyes and beak can be painted or sewn on with beads and fabric.


Now in your arsenal of ideas there are several on how to create birds from scrap materials with your own hands. Maybe ready-made options will push you to new searches and creative achievements!

Do-it-yourself photo of birds


Summary: Bird crafts from paper. Craft a bird with your own hands. How to make a paper bird. Spring crafts for children. Children's spring crafts from natural materials.
The most faithful friends of Spring are birds. In spring, nature awakens from hibernation, trees are filled with life-giving sap - life is everywhere! And birds are the first to remind us of this. The hubbub of birds welcomes the rebirth of nature with overwhelming power. For this reason, we could not but include in our section "Spring crafts with children with their own hands" a selection article "Crafts of birds from paper and fabric." We will teach you how to make paper birds. Using our ready-made templates and detailed instructions, you can make an original spring craft - the Spring Birds mobile, which will decorate the interior of your home. You will also learn how to sew beautiful birds from fabric.
1. Crafts of a bird. Paper birds
A very simple spring craft for kids. To make these cute paper birds, you will need scrapbooking paper, colored paper clips, glue, and a hole punch.
Download the bird template from the link >>>> Print, cut out. To craft one bird, you need two mirror pieces. Before glueing them together, take two paper clips, straighten them to form "bird's feet". Place them between the two sides of the bird, glue the sides together. Punch the eye with a hole punch. Children's spring craft is ready!
2. Crafts bird. How to make a paper bird
We present to you another simple spring paper craft. It can be done in just 10 minutes.

And one more spring craft - a mobile from the well-known blog madebyjoel.com On this site you will also find a video instruction. The template can be printed from the link.

4. Children's crafts spring. DIY birds crafts
If you don't know how to make a paper bird, then be sure to visit the Bulgarian website Krokotak.com. There you will find two gorgeous spring crafts for children: a white stork and a swallow.
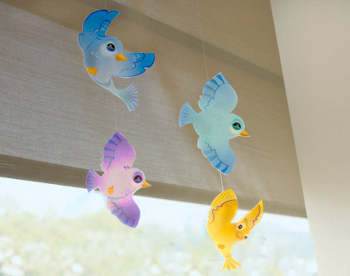
White paper stork. How to make a paper stork

The white stork is an exceptionally positive symbol for most of the peoples of Europe, Asia, America and Australia, the emblem of the sun, peace and goodness. A stork that arrives from warm regions in late March or early April is quite naturally associated with spring and the beginning of a new life. Since a large, proud bird is not at all afraid of humans and makes nests on the roofs of houses or on the tops of nearby trees, returning annually to its old, inhabited place, people are used to considering it as a guardian angel of the hearth, as a peaceful symbol of constancy and well-being.
The storks in the photo below are made from cardboard disposable plates and disposable plastic spoons. The paws of the birds are made of small coffee spoons. To make this DIY spring craft, you will need a glue gun.
Paper swallow. How to make a paper swallow

The grass turns green
The sun is shining;
Swallow with spring
In the canopy flies to us.
(Alexey Pleshcheev)
Probably, the swallow is second only to the white stork in popularity. The attitude of the people towards her is especially warm and kind. And of course, she is a symbol of spring, the return of the sun. The Hermitage contains a Greek vessel - a pelica with a wonderful drawing: an adult man, a young man and a boy joyfully greet a swallow that has returned in the spring.
Note: the eyes of the swallow are glued on the purchased ones (the so-called "eyes for dolls"). You can buy such eyes, for example, in the Read.ru online store. See link >>>>
5. Crafts on the theme of spring. Bird crafts
From an ordinary paper plate, you can make an original craft on the theme of spring - a bird in a nest. For decoration, it is appropriate to use decorative feathers.

Of course, it is not good to keep live birds in a cage, it is better if they fly free. We will make a spring craft bird in a cage made of paper and a plastic cover. For a detailed master class, see the link.

See what cute birdhouses, together with the tenants, can be made from the so-called. waste material. It is appropriate to decorate the wall in the children's room with such a spring craft. The birdhouses themselves are made from cardboard bags made from milk or juice. Outside, they were painted with acrylics. The birds were made from plastic containers from kinder surprises.

Such bright spring birds on wires can be easily and simply drawn using fingerprints.


This spring birdie applique is made using paper cupcake molds. Even a small child can make such a spring craft. The molds must be folded (or cut) in half, glued to the paper, and then painted with paws, beaks and eyes for the birds.

6. How to make a bird out of fabric. How to sew a birdie from fabric
Birds can be made not only from paper, but also from fabric. Felt is best suited for these purposes. You can decorate a bouquet of spring twigs with ready-made fabric birds.
Bulky paper birds can become an original decoration.
In addition, the bird is hollow and you can put a small thing in it and give it to your loved ones!
you will need:
- a printer,
- hot glue gun or fast drying glue,
- two sheets of medium-weight paper,
- scissors.
Print out the details of the bird and cut it out neatly.

The sequence of assembling a paper bird, look at the video:
Advice:
If you cut out parts from thick cardboard, then in the future they can be reused as a template.
Martin
See how you can make such a cute swallow out of paper:
You will need black, white and red colored paper, glue, stapler, scissors.
Let's get started.
First you need to cut out the details shown in the figure from colored paper. 
Now let's take a small strip of black paper - this is the future head of the swallow. We will fold it with a ring and fasten it with a stapler. The big black stripe is the future torso of the forked-tailed bird. We will fold it and fasten it with a stapler, as shown in the figure. 
Then we glue the "shirt-front" of white paper to the body and head of the swallow. Do not confuse: the shorter piece is towards the head, and the longer piece is towards the body. 
connect the head and body of the bird with glue or a stapler.
The next step is to glue the wings to the body.
Then we will arrange the head of the swallow - glue the eyes. They can be purchased at a sewing supply store, or simply glue together from larger white paper circles and smaller black circles.
It remains to glue the beak. Take the remaining diamond-shaped piece of red paper, fold it in half and glue it to the bird's head.
Our wonderful paper craft ready! It was not difficult to make it. Children will be happy to play with this swallow, and in the process of making it they will learn how to make with their own hands voluminous crafts from paper. 
Paper swallow - costume element 
Voluminous birds
These birds will consist of the same elements - body, head, tail, beak and eyes.
First you need to prepare strips of certain sizes, depending on which part of the bird they will be used for.
So, for the body you need 5 paper strips 2.5 cm wide and the following lengths - 7.5; 10; 12.5; 15; 17.5 cm.
For the head, two strips of the same width, the length of which is 6.25 and 8.75 cm,
and for the beak, the strip should be 5 cm long.
For the tail, you need to prepare 5 strips, 3.75 cm wide, the length of which will be 5; 7.5; 10; 12.5; 15 cm.
You should also cut out two circles, 1 cm in diameter - these will be the eyes of the bird.
A paper strip bird can be made as follows:
workpieces for the body should be twisted into a circle and the ends glued. Then put all the circles inside each other and glue at the base.
Until it dries completely, it is better to fix the bonding place with a clothespin.
Similar actions should be done with blanks for the head.
When both parts of the bird are ready, you need to connect them and start making the tail.
The tail strips should be triangular with scissors and the wide ends curled slightly.
Next, lay the parts on top of each other and glue them on the narrow side, and then attach to the body.
The beak and eyes remained.
To make the first, you need to fold the strip in half, then bend the corners from the side of the bend and fold them inward.
Eyes are made by winding a small circle around the tip of a toothpick to form a ball. Now you need to attach the last two parts to the corresponding places - and the craft is ready. 
Blue bird from egg
Wash and dry the egg thoroughly.
Then make a hole on both sides with a thin needle and "blow" the contents into the bowl.
Next, the egg must be given a blue color - this will be the body of the bird.
This can be done using both special paint and watercolors.
When the workpiece is dry, it should be placed horizontally and the wings should be glued to the “back”, and the tail should be glued to the back.
To make these parts, you will need strips of blue chiffon or mesh fabric.
The beak must be cut out of yellow paper and glued to the appropriate place, and two eyes must be painted with black paint.
Thread the fishing line through the holes in the egg made earlier and tie the ends together - this will allow you to place children's crafts in a conspicuous place.
Birds made from eggs by your children can decorate any room in the house. 
Bird crafts have always been very popular among lovers of home art. Figures of feathered creatures are especially relevant on Bird Day, which is celebrated in the spring of April 1 in kindergartens and schools. The holiday is dedicated to the return of migratory birds and marks the onset of spring and the renewal of awakened nature. On this day, children of all ages make bird crafts, and older schoolchildren make birdhouses and hang them on trees.
Bird crafts can be made from a wide variety of materials: cotton pads, colored paper, plastic bottles, salt dough, natural and any materials at hand. There are many options for creating birds - from simple ones for young children to complex ones, which schoolchildren can easily master, resorting to the help of adults.
We bring to your attention several lessons on creating birds with your own hands with step-by-step instructions, diagrams and tips. We hope that they will help you learn all the intricacies of this exciting process and be filled with new bright ideas.
Peacock for a summer cottage from plastic bottles - a master class

We will need: plastic bottles of various colors, polystyrene, a wooden block as a stand, a metal rod, foil and thin colored plastic, a glue gun.

Step one, Cut out the body of the peacock together with the head from the foam, not forgetting to make small indentations in place of the eyes. We attach it to a wooden block with a metal rod, which plays the role of legs.

Step two. We make a sufficient number of peacock feathers from plastic bottles of different colors. We need three types of feathers: long for the tail, short for the neck and slightly longer for the body. To do this, cut off the bottom and neck of the bottle and cut it lengthwise into 3 parts.
We round off one end of each strip with scissors and cut its edges into thin stripes so that it looks like a bird's feather. We decorate the rounded end of the feathers intended for the tail with two or three multi-colored ovals made of foil and plastic. You can attach them using a stapler.


Step three. Cut out the beak from the red plastic bottle and fasten it in place. Next, step by step, using a glue gun, we glue the feathers on the body of the bird, starting with the tail and ending with the neck. We attach the feathers with a little overlap, as shown in the photo. Do not forget that medium-length feathers are intended for the body, and gentle ones - for the neck.

Step four. We cut out a crest of any shape from colored plastic, which our imagination prompts, and glue it on the head. Using acrylic paints, paint the peacock's eyes. You can glue eyelashes cut from a clear plastic bottle to them.

Step five. We start making the tail, using an abrasive mesh for this. We make holes at the base of the feathers and attach them to the mesh using a thin wire.
We start making the tail from the end, gradually laying the feathers on top of each other in rows, until the luxurious long tail of the bird is fully formed. After that, we attach it to the body and put a peacock, made with our own hands from plastic bottles, on a site among flowers and greenery.
Do-it-yourself salt dough firebird - master class

For Bird Day, together with children, you can make a voluminous firebird from salt dough. The work will take little time, require very few materials and will provide the children with a cheerful and festive mood.
We need: salted dough, gouache or watercolors, colorless varnish.

Step one. Making salted dough. To do this, mix a glass of flour with a glass of salt and knead the dough by pouring 100 ml of brewed starch into it. We prepare it as follows: dilute a tablespoon of starch in 100 ml of cold water and pour a glass of boiling water into this mixture.

Step two. Divide the salted dough into 5 pieces and paint them in different colors. To do this, add gouache or watercolors to each piece and knead it slightly again. Next, we draw a sketch of a firebird and sculpt the details of the bird on it: wings and a body. Dry them in the oven at a low temperature.

Step three. We make the tail fairy bird... We draw stencils of feathers and sculpt them from pink and blue salted dough on them. Dry the feathers in the oven. Next, we paint all the details of the bird with paints, cover it with colorless varnish, and connect. We decorate a colorful festive panel with crafts. The salted dough firebird is ready!
Birds from cotton pads - master class

Another very cute craft that is perfect for decoration kindergarten on a wonderful holiday Bird Day. It's easy, fun, and fast. Young children can be involved in making birds from cotton pads.
For creativity we need: cotton pads, wooden skewers, colored paper, narrow colored ribbons, plastic eyes, glue and scissors.
Operating procedure:
- We take 5 cotton pads to create one bird. We cut one disk into two halves, and leave four whole.
- We fix two pairs of cotton pads on the skewer with glue so that it is inside. One pair of discs plays the role of the bird's head, and the other - the body.
- We glue the halves of the cut cotton pad to the body on both sides - these will be our wings.
- We glue the eyes and beak cut from a piece of colored paper to the head, and decorate the bird with a ribbon. A cute baby bird from cotton pads is ready for Bird Day!
Colored paper owl - master class

You can make cute owls for celebrating Bird Day at school with your own hands from colored paper. We will need directly colored paper itself, scissors, double-sided tape and glue.
Operating procedure:
- We make a cylinder from a sheet of colored paper, glue its edges on one side, as shown in the photo, and press the middle so that we get ears.
- Cut out a heart out of paper and glue it to the bottom of the cylinder - these are the legs of an owl.
- We cut circles of the same size and glue them on the central part of the cylinder as plumage. In order for the circles to add volume to the craft, it is better to stick them with double-sided tape.
- Cut out a triangle in the same color as the legs, and glue it in the upper part of the plumage - this is the beak.
- Last of all, we glue the eyes by cutting out circles for them from black and white paper. The do-it-yourself owl is ready!
Do-it-yourself bird of paradise made of polymer clay - master class

Delightful birds of paradise are made from polymer clay that hardens in the air. This modern material is also familiar to us under the names "self-hardening plasticine", "mass for modeling" and "velvet plastic". To make charming feathered creatures, we need an aluminum wire with a diameter of 1 mm, polymer clay, foil, scissors, round-nose pliers, a stack, a glass for rolling out clay, a little patience and diligence.


Operating procedure:
- We create three birds at once - while we sculpt one, the rest dry up. Cut a wire twice as long as the planned tail. We wrap half of the wire with foil, crushing it and forming the body of the bird.
- We make paws from wire, as shown in the photo, and insert them into the body. We take a piece of clay, shape it in the shape of a sausage, then roll it out and flatten it. Carefully take out the wire from the bird, place it inside the clay sausage, rolling it up with a glass. Insert the finished colored ponytail back into the body. In the same way, we make the blanks for the other two birds.
- We take a piece of blue, yellow and red clay, roll them out and gradually, smearing them with our fingers, we stick them around the birds until all the foil is covered. We will have three blanks of bright birds.
- Starting from the center, we stick around the legs. Then we take a piece of clay of the corresponding color and make the cheeks, crown and beak. We sculpt eyes from balls of black clay, not forgetting to squeeze the upper and lower eyelids around them with a stack.
- Create a ponytail and a tuft. To do this, we cut off several wires of the desired length and roll them into clay. When it is dry, round off the tips with round nose pliers and insert the tail details into the bird's body. We make shorter feathers from thin clay sausages by twisting the ends.
- We make the plumage effect by putting pieces of clay rolled out in the form of droplets on the body and working with a needle in the direction of feather growth. With the help of a needle, we make feathering all over the bird's body. For shine, the peephole can be varnished. The wonderful DIY bird of paradise is ready!
More ideas and schemes for crafts birds from various materials
For needlewomen who are familiar with the isothreading technique, it will not be difficult to create pictures with beautiful white swans with their own hands and decorate with them a holiday dedicated to the Day of the Birds. Threads for creativity are better to take floss or iris. Draw a swan on the seamy side of the cardboard and draw waves. Divide the drawing into details, drawing shapes of different sizes, and embroider using the isothread technique.


A very charming feathered creature is obtained from woolen threads. You can easily create it with your own hands according to a simple and understandable scheme.


And according to this scheme, by introducing children to creativity, you can make a bird of happiness from a beautiful bright fabric.

Even small children can create such a colorful bird from circles of colored paper.

A charming bird can even be made from a strip of colored paper and a clothespin.

A do-it-yourself bird for Bird Day can be placed in a nest glued from paper plates.

Simple clothespins in the hands of a craftswoman can turn into an extraordinary fairy-tale bird.

And finally, ideas for making birds from natural and scrap materials: cedar or pine cones, painted feathers, cardboard and plasticine.


Spring invigorating mood for adults and children can be presented with handicrafts. A topical topic for master classes is the image of birds returning from warm lands after wintering. The creation of birds, symbols of happiness, from scrap materials turns into a fascinating process in the classroom at school, in the garden or just at home. There are many ways to make a beautiful bird with your own hands, some of them will now be considered.
Bird made of paper
Let's try to make a paper bird using the origami technique, quilling and a mobile. To do this, we need patience and beautiful paper.

Origami
This principle of paper folding originated in Japan and is now popular all over the world. In order to get an elegant, neat bird, you should strictly observe step by step instructions on the picture.

Try to make the most precise and neat folds possible by running along them with the handle of scissors or your fingernail, and also carefully follow the instructions on how to make a bird.

It is possible to create different birds using the origami technique, voluminous and flat, flying and sitting quietly.

Quilling
This type of handicraft has been known in Europe since the fourteenth century. Now people of different ages love to do quilling, this activity calms and captivates, and as a result, beautiful panels are obtained from simply curled pieces of paper.

A firebird made in this technique will look especially bright and unusual. To get started, it is recommended to draw up a sketch, think over the color palette and combinations of elements.


The most spectacularly fiery beauty will sit on a dark blue or black background, as if flying in the night sky.

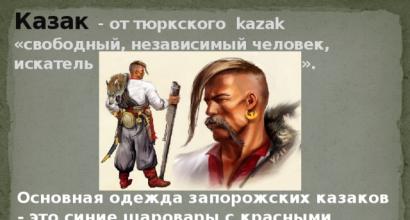
Mobile
The easiest way to make spring birds. To do this, you will need to cut out beautiful silhouettes of birds from colored cardboard, attach cardboard wings, which can also be supplemented with feathers of different colors. Then we pierce a hole on the back with a hole punch and hang the birds by a rope on a stick, which is easy to find on a walk in the park or in the forest.

You can also combine this method with the BEEP technique, bending a sheet of variegated paper with an accordion and thereby transforming it into voluminous wings and a tail, which are inserted into the slots in the silhouette of the body. Such a craft will become an original decoration for a nursery or any other room in the house.

Bird made of thread
It is very easy to make a bird from threads of yarn. To select the shades of threads, you should carefully study the representatives of the selected species of birds and choose the appropriate colors, choose the thickness of the threads. After that, connect several shades (for example, brown and gray) and make 37 turns, winding the threads around the wide part of the palm.


Cutting the ring of threads, we get a long workpiece. Using magazine lumps of paper or cotton wool, select the size of the bird and wind it around the thread.

It is important to style the threads like strands of hair, imitating feathers. A knot of yarn will serve as a head, and the remaining bristles of thread will wrap around a ball of cotton or paper, creating a body. The beads will turn into prying eyes, and the legs will grow out of chenille wire.

Bird made from natural materials
Birdies, collected from twigs, cones, feathers, acorns, shells, etc., look very cute and natural. Plasticine and paper are used as fasteners and detailing of the craft.

It's nice to collect materials for handicrafts in nature, finding a variety of fruits and leaves, unusual plants, spruce cones, chestnuts, shells, nuts, moss - you need to stock up properly so that you have plenty to choose from.

Before you start tinkering with a bird, find its image, draw a sketch to provide an approximate design. Then you can recreate your favorite drawing in volume using convex elements, or on a plane using variegated leaves.


Mother Nature endows us with such diverse and colorful materials for creativity and, as if she herself is giving us a master class on how to make a bird.

Salted dough bird
To begin with, let's choose a sufficiently strong and inflexible background-base. This can be an old plate or a ceramic plate that has been previously painted in the desired color.

During the manufacture of poultry from salted dough, we need mixes of several colors and without dye. To get the dough, knead 1 part salt and 2 parts flour, then combine the pieces with the paint of the required colors diluted in water.

We sculpt the body and wings of a bird from white, glue it with PVA glue to the base. Then we paint the bird in accordance with the desired look.

To the base around the bird we glue elements of the natural background fashioned from colored dough, for example, tree branches, leaves and berries. With the help of a stack, we outline the veins and plumage.


Bird made of plastic
A good way to recycle plastic waste into adorable crafts is by making birds from pet bottles. This is an easy way to decorate your house, garden, summer cottage or your favorite yard. A body is made from a five-liter bottle, a hose is pushed into its neck, and a wire is inserted into it, which will create a natural bend of the swan's neck.

Feathers are cut from a white bottle of fermented milk products, the edges are processed with a lighter and attached to the frame from top to bottom in a spiral, previously fastened with a wire to each other.


It is recommended to fasten the entire frame with wire, and make the beak from cut out and red-colored parts of the bottles. A photo of a homemade bird demonstrates how easy and interesting it is to turn waste into craft materials.


We have revealed only a few secrets, but there are a great many options from which you can still make birds at home, and everything is limited only by your imagination.

Spend more time on manual labor with growing craftsmen by discovering wonderful world inventions. Communicating with the world in the language of creativity, your child will learn to understand and manage it, and you will gain a strong connection with your child.

Photo of homemade birds